I’m always looking for a project, and a good deal, so I’ll often browse Ebay and see if there’s any cheap “for parts only” complete miners to buy. Most the times these get bid up near complete working unit prices, but from time to time they are either overlooked or scary enough from the pictures that people pass on them. My most recent find I picked up for around $300, complete with all hash boards and power supply.
When I received the unit it was packed well, but dirty, I’m talking that black dust that you can only seem to find in the darkest corner of some mining warehouse. Also a couple boards seemed to have been unplugged for sometime (like they stopped working before the rest) and the control board was broken out of the rails that hold it in place. OK, we’ve got our work cut out for us.

First thing I always check when I buy a miner is the control board. I disconnected this, blew it off with compressed air, cleaned it in an alcohol bath, blew it off again, then hooked it up to my network with a custom power connector I made from an old 12V/600mA DC adapter. It powered up fine and I got lights on the ethernet connector but it never connected to my network and even running a network scan I couldn’t see anything new attaching. Holding down the reset for 10 seconds didn’t clear it, so either we have a corrupt control board or a bad one. I decided let’s go worst case and assume it’s corrupt with a virus so we’ll use the guide that CustomMinerService.com developed to recover the control board. Without stealing his thunder (click on the link to his website for full details), you basically have to complete the following steps:
- Solder a jumper wire and 1-10k resistor between two pins on the backside of the control board
- Flash Bitmain recovery firmware to an SD card and install this on your control board
- Wait a few minutes and pray you get two flashing lights (red/green) on the front
- Turn off
- Remove the SD card, jumper wire, and resistor
- Turn on
- It should now boot to Bitmain stock firmware
I’ve obviously skipped and gleaned over some details above, but u/BornShook has it all explained extremely well on his website. I will say I’ve followed this set of instructions several times and it’s worked perfect, and for this latest project that 100% did the trick, so now I’ve got a working control board again! Next step, flashing HiveOS to the control board, which can be tricky with the Bitmain signature checks, however I’ve got an article that takes you through the process step-by-step and I’ve done it dozens of times with success.
Once the HiveOS is loaded it was time to turn to the hash boards and case. One thing I noticed right away was that the fans were installed backwards and were fairly new. I’m not sure if they had some custom venting that had them do that, or just a simple mistake, but we’ll fix that up. Just like the control board, my first steps for testing a hash board include:
- Brush off thick dust deposits first (always wear glasses when blowing compressed air)
- Blow through board, connectors, and under heatsinks (be careful around heat sinks as you don’t want to get too close) with compressed air
- Brush off any remaining dust deposits
- Blow one more time
- Put in alcohol bath and slosh around, brushing off any remaining thick deposits
- Pull out and let drip dry for 30 mins
- Blow one more time, making sure to blow out connectors well
- Wipe off any residue and inspect board for any obvious defects.
Once I do this for all hash boards, I will install them into the system one at a time and bring the system up. Once I see the board is hashing I will move onto the next. In this case all four came right up so I installed them back into the system, fixed the reversed fans, and brought the whole system up. Slowly I cranked up the speed and ran an autotune
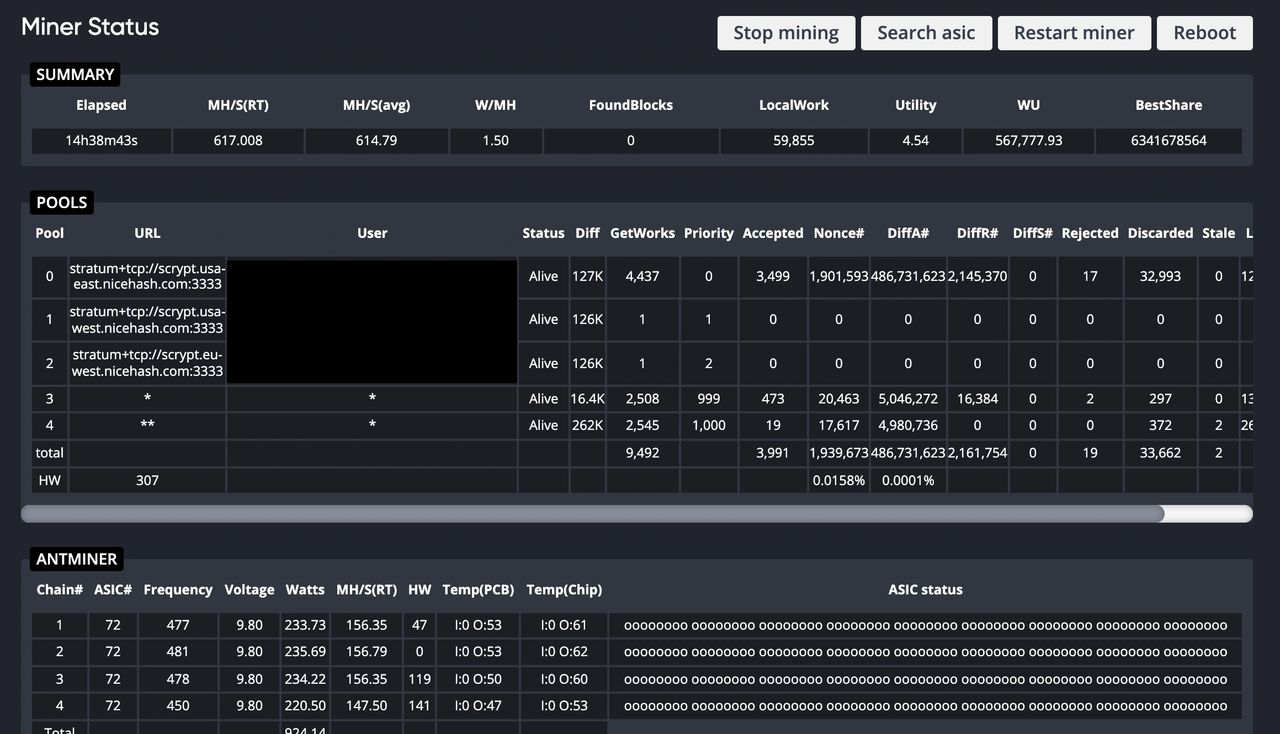
All in all I was into this project for $325, a couple hours of labor, and to my amazement the system is cranking away 14 hours later at 615MH/s with a nonce around 0.01%. That’s a true diamond in the rough.


Good time of day.
To switch the control board to the firmware recording mode, you do not need to solder anything.
It is enough to close the 3 leg and the mass on the board for a few seconds before starting the control.
Screenshot from the link –
https://disk.yandex.ru/i/Mhf_liNXROtmSw