
To continue the journey into setting up your crypto miners, specifically the L3+, you should start considering a long term electrical plan. What I mean by this is how can you optimize your existing electrical circuits in your home, office, shed, or wherever to gain the most MH/s(AVG) per watt (W/MH) and overall the most MH/s(AVG) per circuit.
Update 12/27/21: I’ve had many folks ask how to measure their power draw. One solution that works very well is to install a Sense Energy Monitor on either your main electrical panel or a sub-panel that you have dedicated to your miners. This will give you real time feedback on the power (watts) used by your devices and make it easier come tax time to properly divide up your electrical bill and have the proof of the percentage you dedicate to your mining operation.
I’ll assume that all units will operate off 240V for this, as it’s generally considered the most efficient as you pass less current through the wiring than you would if you went the 120V route, which minimizes cost and power transmission loss.
After some testing of various operating power/efficiency levels (Overclocking on the L3+, is the juice worth the squeeze?) of the L3+, I’ve got a good data set that gives me an efficient range to operate the L3+ within. So what now, data, great, how do I put it to use?
I ran the tests at frequencies from 384MHz (stock) to 500MHz and each frequency I ran at 9.5VDC, 9.8VDC, and 9.92VDC. The most ideal setting (with the best W/MH) for overall hashing rate was 469MHz, giving us ~608MH/s(AVG) @ 1.54W/MH (935W total.) The most ideal setting for overall efficiency (W/MH) was 384MHz, giving us ~504MH/s(AVG) @ 1.4W/MH (695W total.) A midrange that balances the two was 450MHz, giving us ~576MH/s(AVG) @ 1.52W/MH (873W total.) We also have to add in the wattage for the control board and fans. I took some measurements with an ammeter and found that the control board was only drawing about 10W and the fans, albeit variable, will generally draw no more than their max rating which would be ~30W each.
Note: These are all numbers that have not had any type of auto-tuning done at the individual chip level so your actual numbers can vary depending on that process if you chose to do it. These are just baseline numbers to go off of.
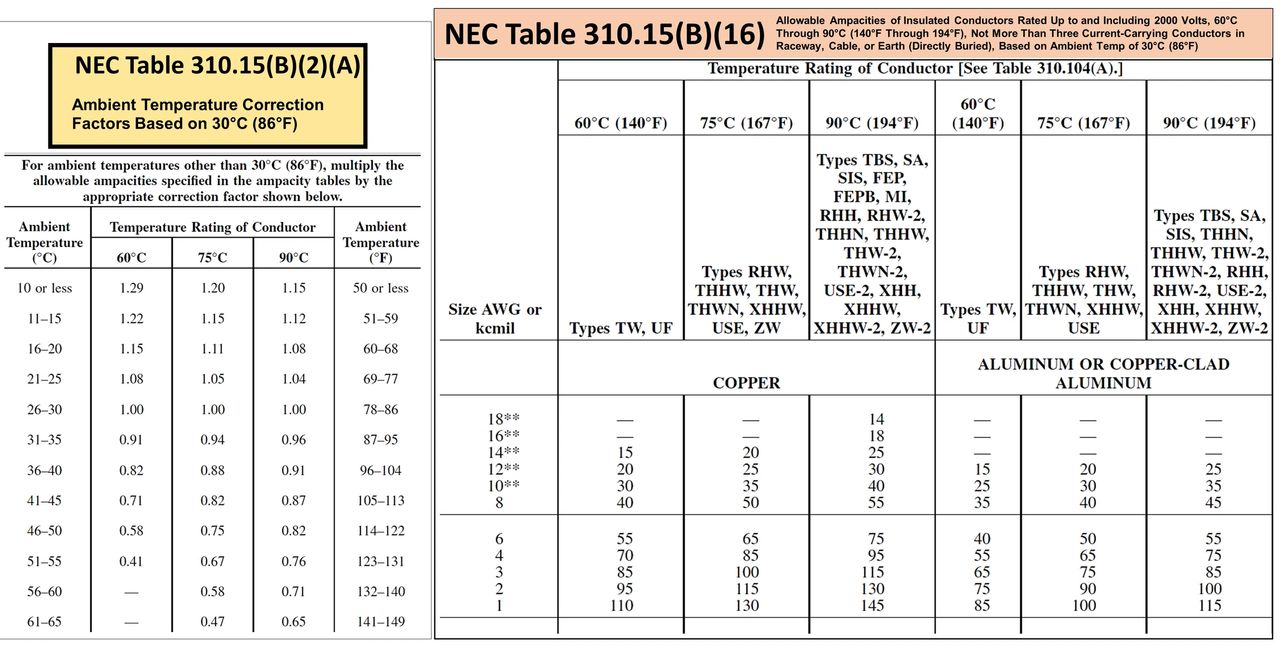
For those that aren’t familiar with residential or commercial wiring, a quick note on how much to load the circuits. The National Electric Code (NEC) essentially requires that each circuit have the ability to carry 125% of the continuous load. So if we have a 20A circuit, that is our theoretical 125%, which puts the continuous load at 16A (16A x 125% = 20A.) Head math shows that 16A is 80% of 20A, hence the 80% rule. After we determine the size of the circuit (i.e. 20A) we then reference the NEC code to find the appropriate wiring gauge for the circuit. This is code for one very good reason, you don’t want to overload and heat a smaller gauge wire too much or you’ll burn it up, and burn down your structure. I’m sure many folks have seen this on the DC side with wiring from power supplies to either ASIC miners or GPUs. I’ve chosen to use 20A for most my setups, mainly due to cost of the wire (12 gauge wire is significantly cheaper than 10 gauge), but also the efficiency calculations you’ll see later on in this post.

So let’s get into the meat and potatoes of what this is all about. I’ve listed out the most common circuits you’ll find and created scenarios based off those.
20A/240V – Given the 80% rule we have 3840W available to support our L3+ units.
SPEED
L3+ @ 469MHz = 935W + 10W (control board) + 60W (fans) = 1005W total.
3840W / 1005W = 3.82, so basically we can only run 3 L3+ units with plenty of room to spare and we are getting 1,824MH/s(AVG) out of the 20A circuit.
As a side note, we can toss one more L3+ in there at the most efficient setting (see below for wattage calculation) and that puts us at a total of 3780W and 2,328MH/s(AVG).
EFFICIENCY
L3+ @ 384MHz = 695W + 10W (control board) + 60W (fans) = 765W total.
3840W / 765W = 5.02, so now we’re up to 5 units and we’re getting 2,520MH/s(AVG) out of the 20A circuit.
BALANCED
L3+ @ 450MHz = 873W + 10W (control board) + 60W (fans) = 943W total.3840W / 943W = 4.07, so now we’re at 4 units and we’re getting 2,304MH/s(AVG) out of the 20A circuit.
30A/240V – Given the 80% rule we have 5760W available to support our L3+ units.
SPEED
L3+ @ 469MHz = 935W + 10W (control board) + 60W (fans) = 1005W total.
5760W / 1005W = 5.73, so basically we can only run 5 L3+ units with plenty of room to spare and we are getting 3,040MH/s(AVG) out of the 30A circuit.
As a side note, we can toss one more L3+ in there at the most efficient setting and that puts us just over the 30A circuit at 5790W. Promise me you’ll unplug one intake fan (-30W) and that would give us 3,544MH/s(AVG).
EFFICIENCY
L3+ @ 384MHz = 695W + 10W (control board) + 60W (fans) = 765W total.
5760W / 765W = 7.52, so now we’re up to 7 units and we’re getting 4,032MH/s(AVG) out of the 30A circuit.
BALANCED
L3+ @ 450MHz = 873W + 10W (control board) + 60W (fans) = 943W total.
5760W / 943W = 6.11, so now we’re at 6 units and we’re getting 3,456MH/s(AVG) out of the 30A circuit.
50A/240V – Did you disconnect your AC or hot tub for these miners or something?
You probably are spending more money in wiring (code says you’ll need 6 gauge wiring) then you can make on this circuit in a week. With the wiring and conduit, you’ll spend close to $5 per foot. In other words, stick with 20A (12 gauge wire) or 30A (10 gauge wire), the wiring is available at your local Lowes or Home Depot and comes in Romex so it’s an easier install without needing conduit. That’s all I have on this.
In summary, efficiency is king. Running out units at 384MHz and 9.5V yields us more than an 8% gain in MH/s(AVG) in a 20A circuit and a 14% gain in MH/s(AVG) in a 30A circuit.
Individual results may vary, take it for what it’s worth, but if you have the units, keep them running efficiently and you’ll get the most bang for your buck!